Getting Started Guide
Things You Will Need:
1. An installed version of the SINCAL Exporter tool
The SINCAL Exporter tool is packaged differently for different companies, depending on your IT policies, so it might be installed differently for you, but it is generally either a file copy operation or a normal Windows installer. Contact your IT department or Zepben for support on this step.
2. The location and port of the Energy Workbench server.
This will be the primary place that the tool gets its data from. The EWB will be running as a server somewhere on the network, you will need the location and the port.
2.1 (Optional) The location and port of the load data server
Sometimes there might be a separate location that load data is stored. If this is the case for you, you will need that location. If not, you can use the same location as the EWB server.
2.2. (Optional) An Input Database
Information that is not stored in EWB can be supplied via an Input Database. If you do not have one, you can use a blank file that should come with the installation, called “zone-infeeder-attributes.csv”. Look for this file, and select it when you use the tool.
Getting Set Up:
When the SINCAL exporter starts, it will look for the EWB server and the load data server. At first time start up, these will likely time out, and there will be an error shown. Once you are able to interact with the application, you should select both your network data server and your load data server (set this to your EWB server if you do not have a specific location).
The application should look similar to the image below when it is invoked.
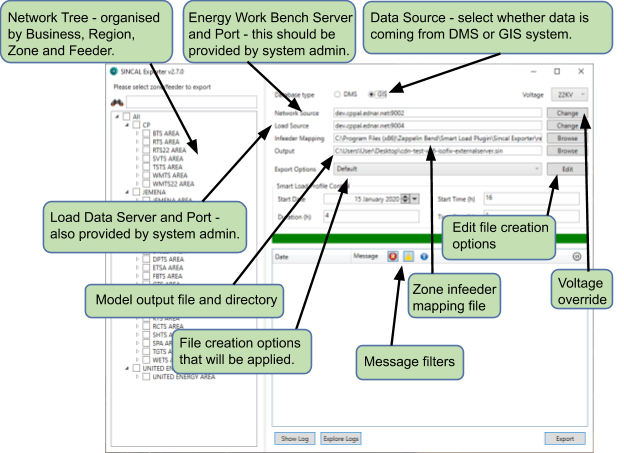
Setting these values will allow the application to connect to the server and download the network hierarchy, which should appear at the left of the screen. This list will display the network available for SINCAL file creation; it should be an ordered list of areas, zone substations and feeders. You can choose which feeders you want to create a SINCAL file for, in any combination.
You will need to enter your input database in the appropriate field. If you do not have an input database, choose the default one (described in the section above). You will also need to set the EWB database type at the top of the page: DMS or GIS. In most cases, this will be GIS.
You will also need to choose an output file – where the SINCAL file should be saved, and what it should be called.
There are a lot of options available for how to configure the export, and how the file should be created.
Exporting a File
Once your basic options are set, you will need to choose what to export. The left hand side of the window shows the available feeders, normally stored by business, then area, then zone. You can type a part of the feeder name in the filter box at the top of the list to filter it. You can select as many or few feeders as you like, and from different zones. However, for best results, it is generally best to stick to a manageable number of feeders that are reasonably close to each other.
Once you have selected the feeders you want, you can press the “Export” button to start the file creation process. Keep an eye on the log in the main window – it will give information about any warnings (orange) and errors (red) encountered in the file creation process. These can be important notes about problems in the SINCAL file, and will give some information on where they might be or how to solve them.
The SINCAL file should be produced and available at the output location specified, with no further action necessary. You will probably find that there are some desirable tweaks to the file, and the options described in the rest of this documentation will give some guidance on how to make them.
Selecting feeders
Any part of the HV network can be selected for export, although care should be taken to choose a sensible subset of the network to avoid perforamnce issues. If your administrator has enabled the option, there will also be the option to include LV networks as part of the export or not. Only LV network available at the source server will be included in the created network; this data may or may not be available on your server depending on how it is set up.
The network tree can be filtered using the search box above the tree.
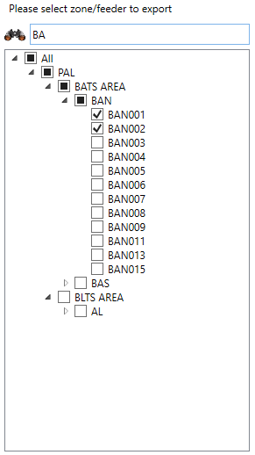
Selecting a network level is done by clicking on or more of the check boxes in the tree, corresponding to a feeder or zone. The display will look something like the following when two feeders under the same Zone are selected for export.